It's hard to believe that it's been so long since I last updated this journal! So much has happened with us, as well as the boat. First, I retired in July of 2007. That's a good thing and now I can work more intensively on the boat (although the winter months are just too cold to endure in the barn). After we finished traveling to see our kids and grandchildren, as well as a vacation in the Cayman Islands (the scuba diving was excellent), I spent what was left of the summer and fall cutting the caulking out of the deck grooves.
I'm not sure why I tackled that chore except that it gave me time to think about the magnitude of the overall project and in what sequence to proceed. That took about 100 hours or so on my knees with a 1/4 chisel and lef
t me with hands that could hardly pick up a toothbrush! A light sanding restored a nice teak color and I have yet to decide just what I want to do to them next.

Just before the Holidays I cut out the old countertops and the vertical trim panels above the galley and navigation station, then during the winter months I did scale drawings of the boat interior for the new Corian countertops, companionway ladder, trim panels, etc. I haven't decided yet whether to convert the old alcohol stove to propane or just buy a new one.
I have to lay-up a new icebox liner in fiberglass this winter from scratch and it will go into the plywood box in the foreground.
Spring came in early April and after the usual clean-out of the barn (bat and bird droppings and the usual dust of four months of being closed up) I proceeded to patch two holes in the hull, one from the old depth sounder transducer and the other from a mysteriously unused seacock beneath the starboard transom berth.
After 12 layers of fiberglass cloth and resin to patch the holes, I felt confident enough to clean up and repair the lazarette, the bottom of which was damaged and pulling away from the fiberglass. I went one more step and installed a small drain which will lead any water in the lazarette to the bilges. Pulling the old engine control lever on the portside wall of the cockpit was a major chore in itself. The unit was loose and old, so I ended up dismantling the whole thing from the inside. A new single-lever model will replace it. Moving into the cabin, I fabricated supports for the new holding tank which goes beneath the portside v-berth.
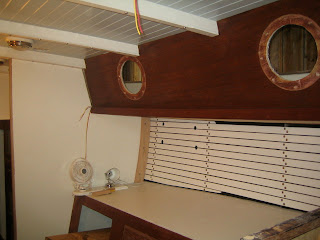
 For the next big chore I laminated up new coachroof beams in oak and through bolted them to the underside of the coachroof (six new beams, plus an additional layer to the one existing beam).
The further beam in the photo has the cap strip screwed into place, whereas the nearest beam is not capped and the through bolts are exposed.
I then cut new headliner panels out of 3/8-inch MDO and routed v-grooves to simulate overhead deck planking and I think that after painting they look pretty decent. The hard part was maintaining the proper alignment of the panel gooving from section to section.

I laminated ribs for the portions of exposed hull interior in the V-berth and the pilot berth in the main cabin to support the ceiling strips and then carefully fitted each of the 50 strips (including leaving cutouts for access to the chainplate attachments). The fitting to the deck curvature was touchy but the overall job was not as difficult as anticipated, just awkward to reach!
In the V-berth I was on my back and for the pilot berth (shown here) I was leaning over the bunk. The insulation is painted black, as are the ribs.
We pulled and cleaned each of the 12 bronze portholes (toilet bowl cleaner does a nice job) and set them aside for installation after painting of the deckhouse exterior later this fall.
We primed and painted the bulkheads separating the V-berth from the head and the head from the main cabin (2 coats of primer and 4 coats of oil-based off-white paint, all "rolled and tipped" for a smooth finish) and I think we achieved a satisfactory finish. Except for the awful cleanup, I like working in oil paint more than latex!
The photo shows the painted bulkhead and the light mounting lying on the pilot berth with the reading light and fan sitting on it. One of these small trim panels will go above each bunk.
Barb stained most of the mahogany plywood forward of the galley that will be exposed and I installed the 12-volt DC wiring for the cabin lights (10 dome lights, 5 reading lights, and a chartlight) and fans (5 3-speed Hella Bora fans).
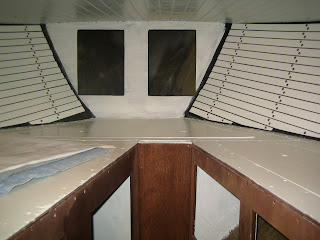
We also painted out the V-berth in white. The lower portion will get finish stained and sea-rails will be added to the sides of the bunks. The forward bulkhead, with is the chain locker, is primed but needs to be trimmed out and doors installed. The lockers below the bunks have both doors and drawers. The headliner is installed here but no trim has been cut and fitted.
I was fortunate to have my old Navy buddy, Joel Heuring, come in to town to give me a hand with the headliner work and insulating - I hope I didn't burn him out!
The end of the interior work is nearly in sight and I plan to wrap it up before the cold weather sets in, as well as overhauling the seacocks and thru-hulls, overhauling and installing the winches, painting out the engine room, and installing the copper foil ground plane for the single-sideband radio (short wave). I hope you enjoy the photos!
posted by tom and barb at 8:05 PM
![]()

1 Comments:
Wow, man! You have done some really nice work.
-Steve
Post a Comment
<< Home